

Let's build a fort: Homelab v1.0
For the longest time, I have put up with random ISP rented routers on my home network or routers that came with the apartments where I happened to be staying. Such devices are usually closed-source, bloated, lacking proper security updates, of limited configurability and the list goes on. These characteristics greatly reduce our network’s security and our control over the network traffic between devices on the internal network and between the router and the Internet. This would be alright if I just cared about the security and control over a single computer, but now I also have a raspberry pi 5 server, a significant other I want to protect with a VPN and other mechanisms, as well as more servers likely to come, such as:
- A local AI box whose network traffic is tightly controlled because we all know local AIs are like unknown entities summoned from another dimension where we need to set up plenty of magic wards to make sure it does our bidding and not the reverse.
- Servers to run or showcase solutions for clients that appreciate security and privacy and not having to also trust some random cloud or VPS provider in addition to myself.
- Self-hosting of a lot of things, for me and my partner, for example a NAS and a local Chat.
- Public facing servers in a DMZ.
So this network setup is essentially the start of what we can call a homelab. This first version of the homelab I describe in this article is minimal and simple as shown in the picture below, but it is meant to be expandable with a managed layer-2 network switch which I will do at a later time:
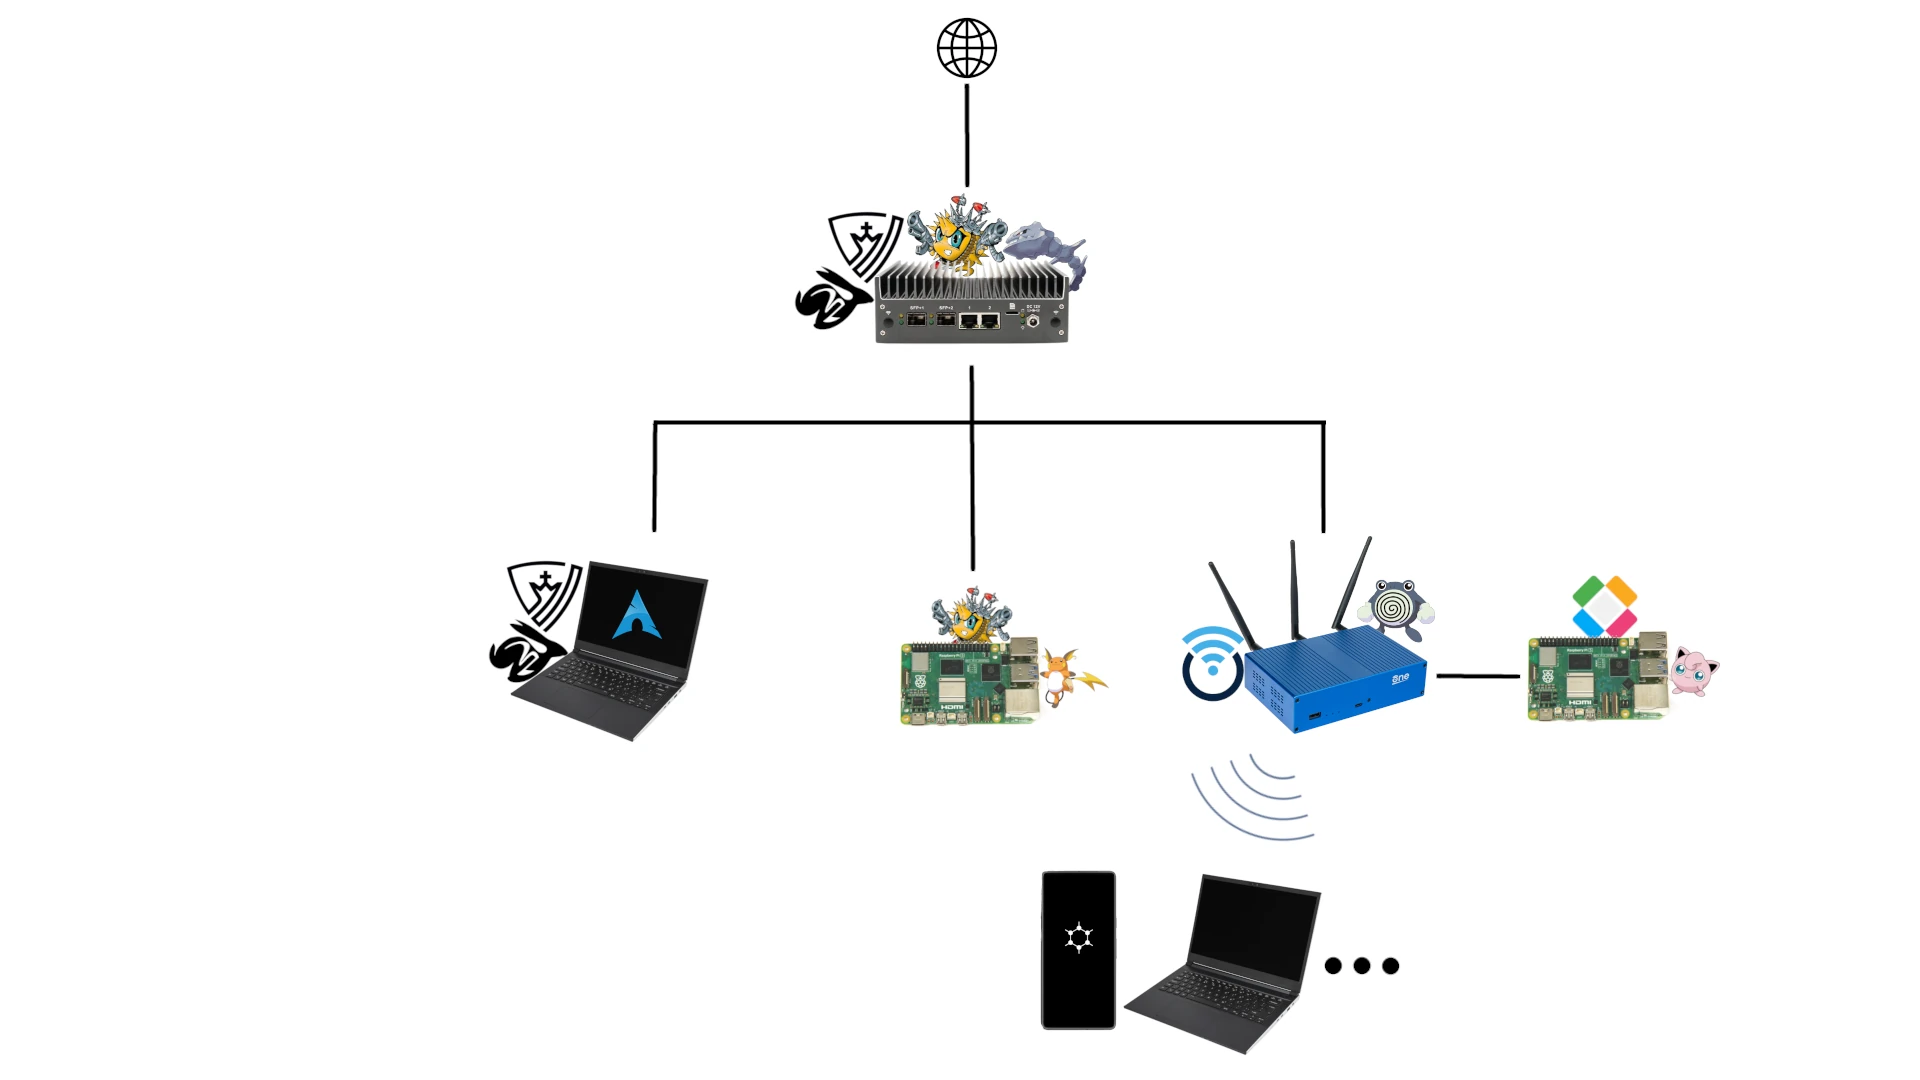
In the following sections I will talk about each notable component of the network setup. I have changed and left out a few non-essential parts of my setup, but this should give the gist of it. To keep it brief, I skip all commands that can actually activate the configurations I share. I assume the reader consults OpenBSD’s and OpenWRT’s documentation for additional details. With all the configurations in place, it should be sufficient to restart the configured devices for all of them to take effect at once. It has always helped me to review example setups along with my learning so I hope this can be useful for someone.
Router
The requirements that I had for the router were the following:
- Runs OpenBSD
- Powerful enough to not be too limiting for future creative use of PF (OpenBSD’s firewall and more)
- Runs as much free software as possible in the firmware, such as with Coreboot
- Has Intel Management Engine (IME) disabled if the architecture is x86
- Is entirely wired, with no wireless hardware
- Has 4+ network ports
The obvious choice after some internet search was one of those Protectli Vault Pro routers and I did go for VP2440 with no wireless chips and with Dasharo Coreboot which disables IME. I was actually quite interested in one of those PC Engines APUs, but PC Engines are not in business anymore since some time ago. They are cheaper, have less of the redundant hardware I don’t really need and no IME. They have a similar thing to IME called Platform Security Processor (PSP), but it is somewhat less severe, but still bad though. Hey, I wish hardware manufacturers stopped these backdoor shenanigans, but all I can do is at least disable what I can of it. Something more the VP2440 has over an APU are two SFP+ ports which allow for 10Gb connectivity. While I only need a 1Gb connection for now, I thought it was nice to have that possibility in the future to be more future proof.
I set up OpenBSD on it without any X file sets, but kept the compilation file set just in case I might need it while I’m still getting used to OpenBSD. Once I become more experienced, I could possibly drop that fileset as well for added security. I chose the hostname steelix. Yes, I chose a pokémon theme for my hostnames to add some fun and nostalgia into the mix. I once had a Steelix that I turned virtually indestructible by pumping up his defenses with iron and HP ups whenever I could. I think that description fits nicely with my intention for this router.
ISP and WAN port
Having a router with an SFP+ port, I could plug the fiber optic cable from an ISP directly into the router via a 1Gb SFP ONT and up it to a 10Gb SFP ONT in the future if need be. This eliminates the need of having the usual ONT box and lets my router get a WAN IP address from the ISP directly, overall simplifying the setup. Here in Iceland, I only got to know about one wholesale fiber optic provider that supported connecting via SFP ONT, and that is the biggest one Míla. I also needed to find an ISP that provides static IPs while connecting through Míla, and one that I found was Hringiðan. The IP is tied to the PPPoE credentials that they give you. Then to connect to the Internet on the router, I put the following into /etc/hostname.pppoe0, replacing authname and authkey with my credentials:
inet 0.0.0.0 255.255.255.255 NONE \
    pppoedev ixl0 authproto chap \
    authname 'authname' authkey 'authkey' up
dest 0.0.0.1
inet6 eui64
!/sbin/route add default -ifp pppoe0 0.0.0.1
!/sbin/route add -inet6 default -ifp pppoe0 fe80::%pppoe0
I also put a simple up into /etc/hostname.ixl0, to activate the physical interface the fiber optic cable and SFP ONT is plugged into.
Wireless Access Point
Not having any wireless connectivity on the router was deliberate and for heightened security of this heart of the network. Wireless connectivity is added complexity and anyone close enough can attempt to connect, which means more potential attack vectors. We still want wireless connectivity in our home for now, so the idea is to have a separate wireless access point (WAP) that is easy to contain. From what I have learned of OpenBSD is that wireless connectivity often tends to not be that well supported, which is understandable seeing as it is a complex domain that often requires more manpower than available for an OS such as this one, and maybe it is not the highest priority either due to its security focus. So I narrowed my search to routers that run OpenWRT, seeing as OpenWRT and Linux in general has more wireless support. OpenWRT is a fairly stripped down Linux distro without systemd and such complexity, so I see that as a plus for security.
First I had my eyes on the start9 router, mainly because it runs on a RISC-V computer architecture which frees hardware manufacturers from having to pay fees for using it, as is the norm otherwise. In effect, the use of RISC-V decentralizes manufacturing more, supporting smaller manufacturers and gives us more choices for our hardware supply chain, some of which hopefully will turn out to be more trustworthy and non-backdoored. I however really needed a usable WAP soon, so I decided to wait with that. In the end I decided to go for the OpenWRT One router to serve as a dumb WAP. When I mention a router from here on, I am talking about VP2440.
One cool thing that you can do with OpenWRT is to have multiple wireless networks you can connect to on one WAP, and you can have each network on a separate VLAN, which is what I did. Those VLANs can have separate privilege levels set on the router’s routing tables and firewall, such as different ones for guests, the family and so on. I might try installing a Tollgate package on the WAP on a separate VLAN at some point too, because it would be cool to know that I could charge random strangers for connecting if I wanted to.
My OpenWRT configuration on the WAP is similar to the following, starting with the /etc/config/network:
config interface 'loopback'
        option device 'lo'
        option proto 'static'
        option ipaddr '127.0.0.1'
        option netmask '255.0.0.0'

config globals 'globals'
        option ula_prefix 'fdab:853:1fb8::/48'

config interface 'privileged'
        option type 'bridge'
        option stp '1'
        option ifname 'eth0.3'
        option proto 'none'
        option auto '1'
        option delegate '0'

config interface 'family'
        option type 'bridge'
        option stp '1'
        option ifname 'eth0.4'
        option proto 'none'
        option auto '1'
        option delegate '0'

config interface 'br-lan'
        option type 'bridge'
        option stp '1'
        list ifname 'eth0.5'
        list ifname 'eth1'
        option proto 'none'
        option auto '1'
        option delegate '0'

config interface 'guest'
        option type 'bridge'
        option stp '1'
        option ifname 'eth0.6'
        option proto 'none'
        option auto '1'
        option delegate '0'
All except the four last interface definitions were in the configuration by default. Each of those four interfaces have a list ifname 'eth0.N' which means it bridges the eth0 ethernet port (which connects upstream to the router) with the traffic tagged as VLAN N. The br-lan interface bridges the second ethernet port and the other three interfaces are used for their respective wireless networks in /etc/config/wireless:
config wifi-device 'radio0'
        option type 'mac80211'
        option path 'platform/soc/18000000.wifi'
        option band '2g'
        option channel '1'
        option htmode 'HE20'
        option num_global_macaddr '7'
        option disabled '0'
        option country 'IS'

config wifi-iface 'privileged_radio0'
        option device 'radio0'
        option network 'privileged'
        option mode 'ap'
        option ssid 'Eagle'
        option encryption 'psk2'
        option key 'some-password'

config wifi-iface 'family_radio0'
        option device 'radio0'
        option network 'family'
        option mode 'ap'
        option ssid 'Shrimp'
        option encryption 'psk2'
        option key 'some-password'

config wifi-iface 'guest_radio0'
        option device 'radio0'
        option network 'guest'
        option mode 'ap'
        option ssid 'Magpie'
        option encryption 'psk2'
        option key 'some-password'

config wifi-device 'radio1'
        option type 'mac80211'
        option path 'platform/soc/18000000.wifi+1'
        option band '5g'
        option channel '36'
        option htmode 'HE80'
        option num_global_macaddr '7'
        option disabled '0'
        option country 'IS'

config wifi-iface 'privileged_radio1'
        option device 'radio1'
        option network 'privileged'
        option mode 'ap'
        option ssid 'Eagle'
        option encryption 'psk2'
        option key 'some-password'

config wifi-iface 'family_radio1'
        option device 'radio1'
        option network 'family'
        option mode 'ap'
        option ssid 'Shrimp'
        option encryption 'psk2'
        option key 'some-password'

config wifi-iface 'guest_radio1'
        option device 'radio1'
        option network 'guest'
        option mode 'ap'
        option ssid 'Magpie'
        option encryption 'psk2'
        option key 'some-password'
Each wireless interface is defined once for each frequency band that can be used. There, that’s all that’s needed for a functioning WAP.
VPN with Wireguard and Rdomains
I wanted some of my connected devices to use a VPN and some not, so instead of going through the hurdle of setting up the VPN on each device, I just added a new rdomain on the router, a separate network that routes non-internal traffic through a wireguard interface. This way, I also don’t need to deal with the complications of getting my devices to talk to each other over the LAN if some of them are VPN connected. To set this up, I created /etc/hostname.wg0:
rdomain 1
wgkey <private-key>
wgpeer <public-key> wgendpoint <ip-address-1> <port> wgaip 0.0.0.0/0
inet <ip-address-2> 255.255.255.255
!route -T1 add default -net <ip-address-2>
Then I filled in the bracketed details according to my VPN provider.
LAN ports
I plugged in an SFP-Ethernet adapter to the remaining SFP+ port so now I had 3 ethernet ports for the LAN. I wanted one of them to be on the VPN and one of them to be where the WAP connects to. The Eagle wireless network was supposed to be under the VPN as well so I had to make sure that VLAN 3 was configured as so. To configure this, I put the LAN port under VPN in /etc/hostname.ixl1:
rdomain 1
inet 192.168.10.1 255.255.255.0 192.168.10.255
I put the normal LAN port in /etc/hostname.igc0:
inet 192.168.20.1 255.255.255.0 192.168.20.255
For the WAP LAN port, I simply wrote up in /etc/hostname.igc1 and made the VLANs as well, starting with the VPNed VLAN in /etc/hostname.vlan0:
create
parent igc1 vnetid 3
rdomain 1
inet 192.168.3.1 255.255.255.0 192.168.3.255 description "AP Privileged"
Then the rest of the VLANs, starting with /etc/hostname.vlan1:
create
parent igc1 vnetid 4
inet 192.168.4.1 255.255.255.0 192.168.4.255 description "AP Family"
Then /etc/hostname.vlan2:
create
parent igc1 vnetid 5
inet 192.168.5.1 255.255.255.0 192.168.5.255 description "AP LAN port"
And finally etc/hostname.vlan3:
create
parent igc1 vnetid 6
inet 192.168.6.1 255.255.255.0 192.168.6.255 description "AP Guest"
DHCP and DNS
On the router I use dhcpd to hand out IPs, default routes and DNS servers to all devices and unbound as a DNS server. I put this into /etc/dhcpd.conf:
subnet 192.168.20.0 netmask 255.255.255.0 {
        option domain-name-servers 192.168.20.1;
        option routers 192.168.20.1;
        range 192.168.20.2 192.168.20.254;
}

# Family
subnet 192.168.4.0 netmask 255.255.255.0 {
        option domain-name-servers 192.168.4.1;
        option routers 192.168.4.1;
        range 192.168.4.2 192.168.4.254;
}

# AP LAN
subnet 192.168.5.0 netmask 255.255.255.0 {
        option domain-name-servers 192.168.5.1;
        option routers 192.168.5.1;
        range 192.168.5.2 192.168.5.254;
}

# Guest
subnet 192.168.6.0 netmask 255.255.255.0 {
        option domain-name-servers 192.168.6.1;
        option routers 192.168.6.1;
        range 192.168.6.2 192.168.6.254;
}
and into the server section of /var/unbound/etc/unbound.conf:
server:
	interface: 192.168.20.1
	interface: 192.168.4.1
	interface: 192.168.5.1
	interface: 192.168.6.1
	interface: 127.0.0.1
	#interface: 127.0.0.1@5353	# listen on alternative port
	interface: ::1
	#do-ip6: no

	# override the default "any" address to send queries; if multiple
	# addresses are available, they are used randomly to counter spoofing
	#outgoing-interface: 192.0.2.1
	#outgoing-interface: 2001:db8::53

	access-control: 0.0.0.0/0 refuse
	access-control: 127.0.0.0/8 allow
	access-control: ::0/0 refuse
	access-control: ::1 allow
	access-control: 192.168.20.0/24 allow
	access-control: 192.168.4.0/24 allow
	access-control: 192.168.5.0/24 allow
	access-control: 192.168.6.0/24 allow
  ...
I made sure to enable them:
rcctl enable dhcpd unbound
The above configurations only work for rdomain 0 however since dhcpd and unbound use only the network stack associated with one rdomain at a time. Therefore I needed to create a second dhcpd config /etc/dhcpd1.conf:
subnet 192.168.10.0 netmask 255.255.255.0 {
        option domain-name-servers <ip-address>;
        option routers 192.168.10.1;
        range 192.168.10.2 192.168.10.254;
}

# Privileged
subnet 192.168.3.0 netmask 255.255.255.0 {
        option domain-name-servers <ip-address>;
        option routers 192.168.3.1;
        range 192.168.3.2 192.168.3.254;
}
I chose the domain-name-servers IP address to be the one provided by the VPN provider. Then all that was left was to create a second instance of dhcpd that uses that config and rdomain 1:
ln -s /etc/rc.d/dhcpd /etc/rc.d/dhcpd1
rcctl set dhcpd1 flags -c /etc/dhcpd1.conf -l /var/db/dhcpd1.leases
rcctl set dhcpd1 rdomain 1
rcctl enable dhcpd1
Firewall and NAT
To keep tight control over the network traffic, I configured OpenBSD’s PF on the router. I built upon some example configurations and did some experiments until I settled on the following configuration in /etc/pf.conf:
int_if_1 = "ixl1"
int_if_2 = "igc0"
wap = "igc1"
int_ifs = "{" $int_if_1 $int_if_2 vlan "}"
table <int_networks> const { $int_if_1:network $int_if_2:network vlan:network }
table <martians> { 0.0.0.0/8 10.0.0.0/8 127.0.0.0/8 169.254.0.0/16     \
	 	   172.16.0.0/12 192.0.0.0/24 192.0.2.0/24 224.0.0.0/3 \
	 	   192.168.0.0/16 198.18.0.0/15 198.51.100.0/24        \
	 	   203.0.113.0/24 }

set skip on lo
match in all scrub (no-df random-id max-mss 1440)
match out on egress inet from ! (egress:network) to ! <int_networks> nat-to (egress:0)
match out on wg0 inet from ! (wg0:network) to ! <int_networks> nat-to (wg0:0)
antispoof quick for { egress $int_if_1 $int_if_2 vlan }
block in quick on egress from <martians> to any
#block return out quick on egress from any to <martians>
block all
pass out on { egress wg0 } inet
pass out on $int_if_1 proto tcp from $int_if_2:network to port { ssh }
pass out on vlan0 proto tcp from $int_if_2:network to vlan0:network port http
pass in on $int_ifs inet
pass in on $int_if_2 proto tcp to $int_if_1:network port { ssh } rtable 1
pass in on $int_if_2 proto tcp to vlan0:network port http rtable 1
In summary, all traffic originating from the Internet to the router is blocked but all traffic originating from the LAN is allowed to the Internet. The devices on the LAN can’t communicate with each other, except that I can ssh from my laptop into my raspberry pi raichu and access some interfaces through http on the Eagle wireless network / VLAN 3. I also NAT all traffic to the Internet.
With all these configurations in place and the router and WAP restarted and connected as shown in the image at the start of the article, homelab v1.0 is good to go!
Conclusion
This basic setup has turned out to be quite usable for me and my partner, and I will incrementally extend it and modify as time goes on. Going through it has taught me a lot and given me greater appreciation for what OpenBSD and OpenWRT can offer to the cause of claiming real control over a network. An effect of having this much control over the network with a security focused operating system like OpenBSD is that I am much less hesitant to run any kind of bloated, black box, security nightmarish operating system and its apps on a box, hell, even Windows boxes shan’t phase me now. As long as the box’s networking facilities are under my control, I can safely handle it.
I hope this article has been useful or at least inspiring and I appreciate any comments or thoughts. Until next time!
Comments
Access the comment section for the post in Nostr via your default app or web app.